|
|
| Line 82: |
Line 82: |
| and you should get this window, [[Image:Ipython-mac-screenshot.jpg|borderless|center]] | | and you should get this window, [[Image:Ipython-mac-screenshot.jpg|borderless|center]] |
|
| |
|
| Now you should be able to proceed with the [[Software_tutorial/My_first_program | rest of the tutorial]] and get exactly the same outputs. | | Now you can proceed with the [[Software_tutorial/My_first_program | rest of the tutorial]] and should get exactly the same outputs. |
|
| |
|
| == Linux users == | | == Linux users == |
Revision as of 02:53, 14 September 2010
This section helps you become comfortable with the user interface of either Python or MATLAB. You can move to the "my first program" part of the tutorial after this part.
These descriptions are specific to Windows-users. Mac and Linux users will have a similar display.
| MATLAB
|
Python
|
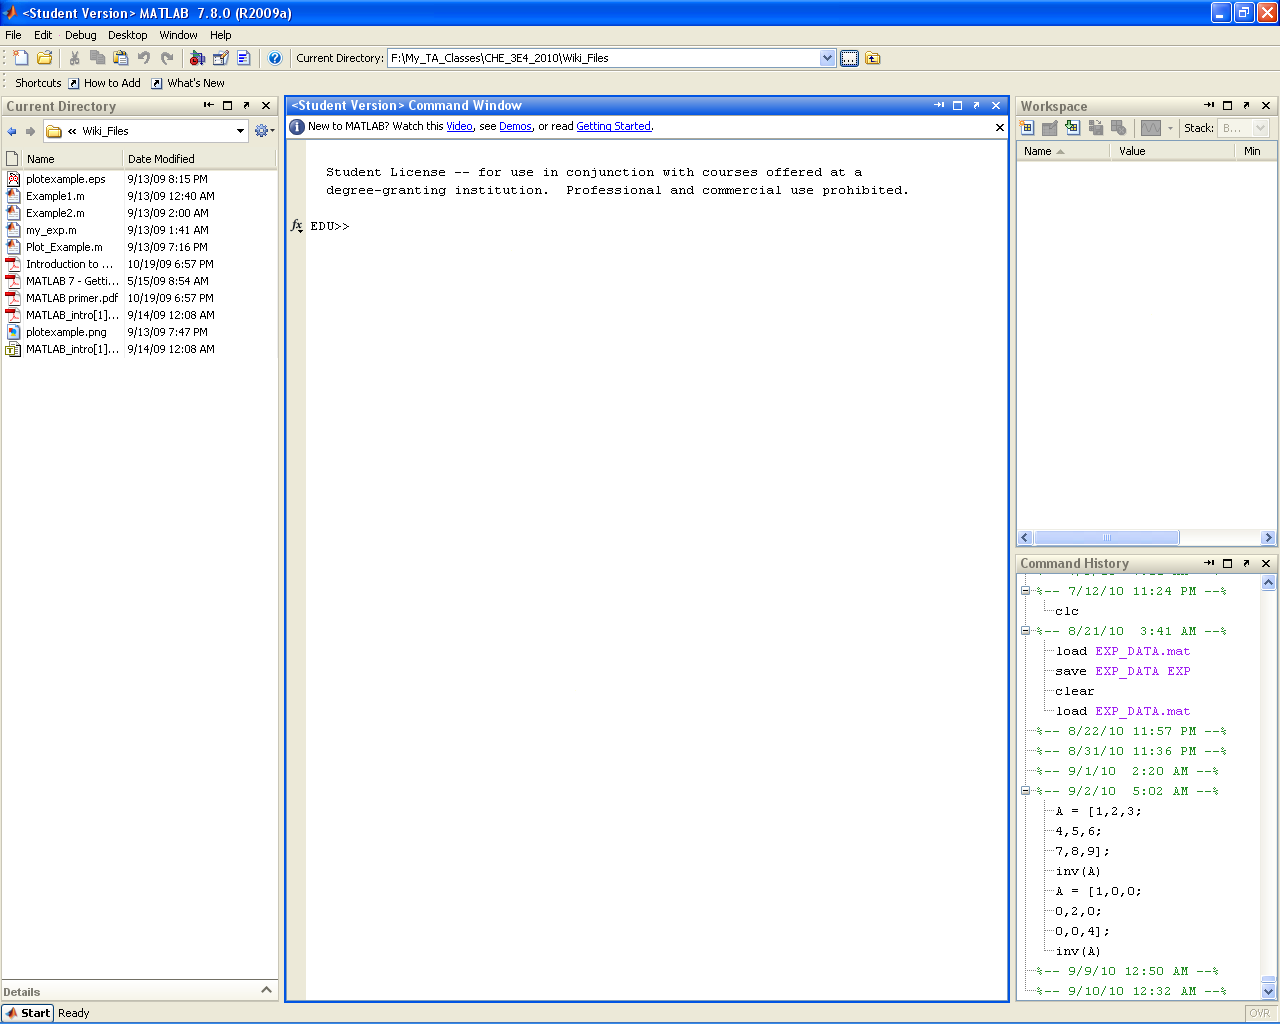
- When you launch MATLAB the following window will open:
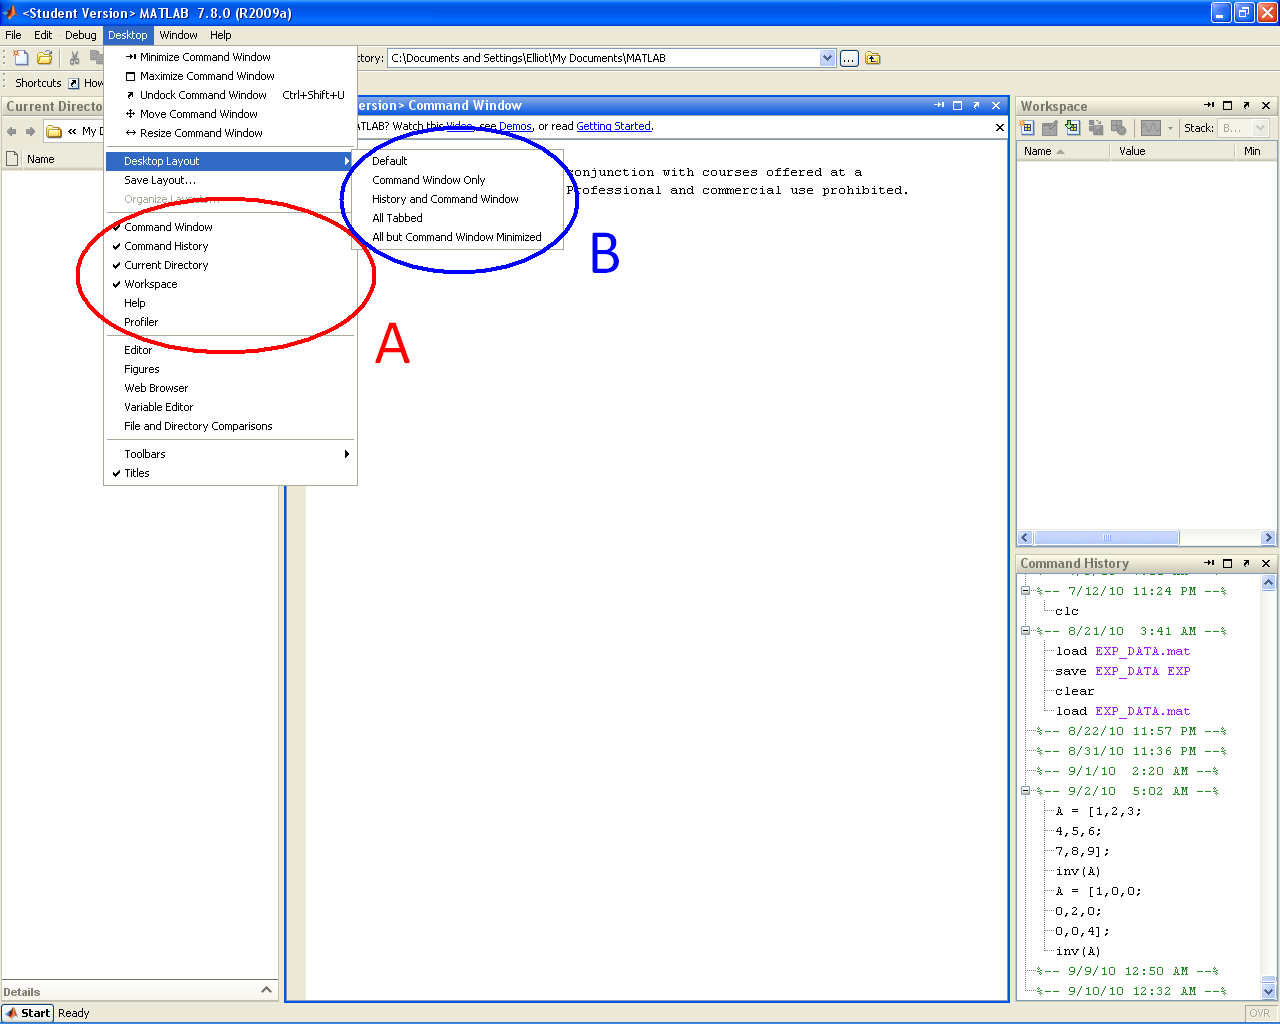
- Do not worry if MATLAB does not open exactly like this. You can easily modify what windows are visible through the Desktop drop down menu. You can select the windows you want either by toggling them individually (Region A) or by selecting a template (Region B). Selecting the default template should give you the window layout you saw above.
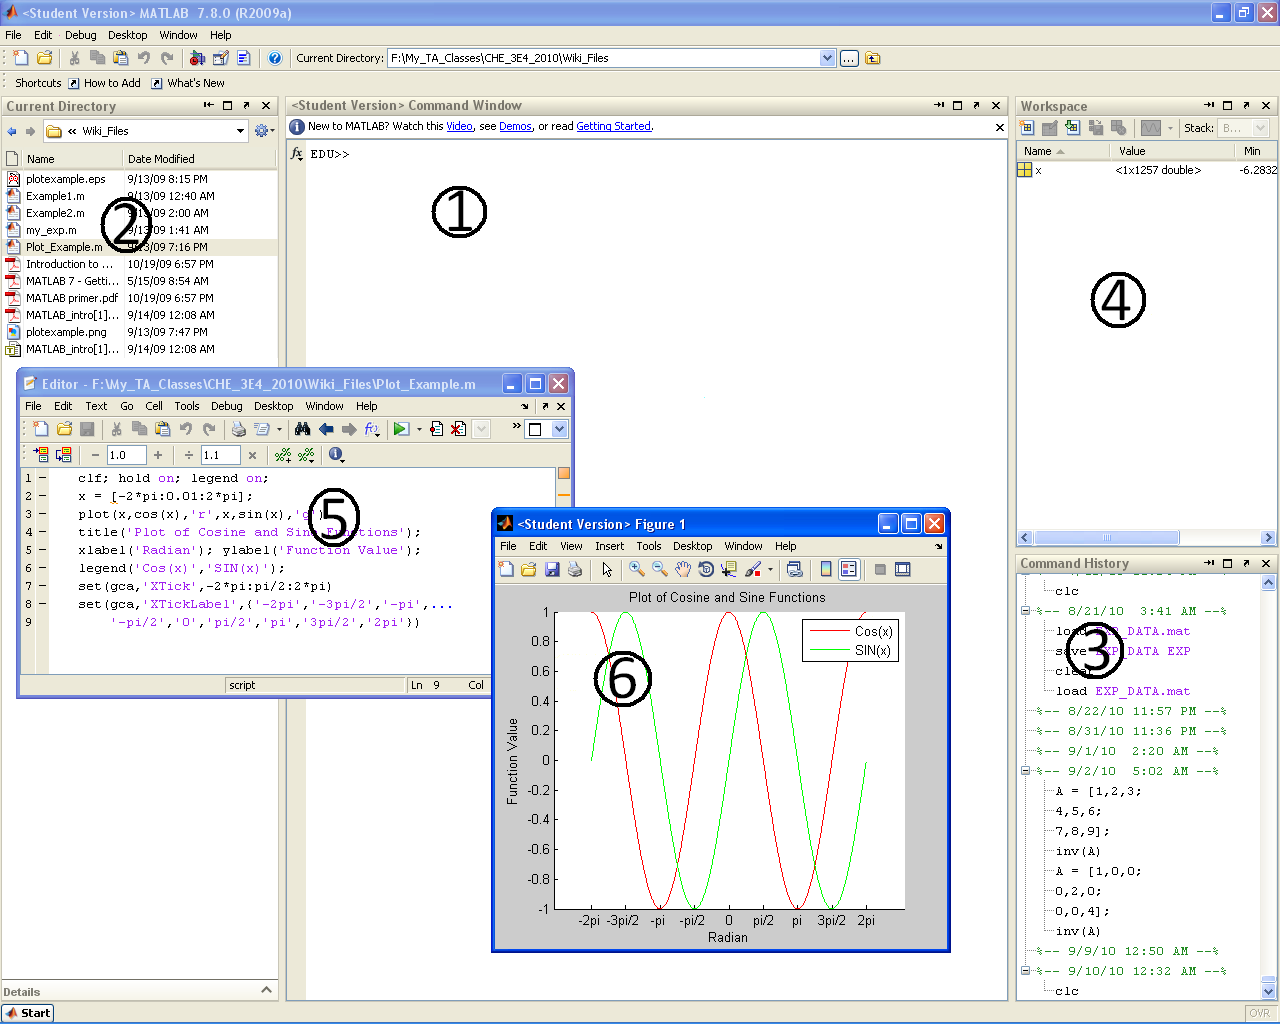
- The core MATLAB setup has 6 main sections of interest that you will become very familiar with by the end of this course:
- 1. Command Window
- The command window (or "command line") provides your main means of interacting with the MATLAB software. The command line allows you to enter simple codes that are processed immediately. All program outputs also appear in the command window. While it is technically possible to write an entire program at the command line, this is not recommended. For true programs, scripts and functions will be used.
- 2. Current Directory
- The "current directory" panel lists all of the files (MATLAB or other) that are located in the directory MATLAB is currently accessing. This directory may be changed via the drop down address bar at the top of the main program window. For a program to run properly, ALL CODES required must be in the same directory (for example, if you write a main script file that calls a separate function file, both files must be in the same directory).
- 3. Command History
- The command history records all commands entered in the command window (for possible future reference).
- 4. Workspace
- The workspace lists all variables, matrices, and function handles currently being stored by MATLAB. The workspace also provides basic information on the values being stored, such as size, max, min, etc. Perhaps most useful is the ability to double click variables and matrices in the workspace to open up the Variable Editor window. The variable editor is essentially a spread sheet representation of your variables that allows for easy manipulation (especially useful for large matrices).
- 5. Editor Window
- The editor window(s) does not immediately open when you launch MATLAB. The editor window is where you write scripts and function files that can be compiled and run in the command window (to be discussed in detail later). To open a new editor window you can either go to File>New>Blank M-File, hit Ctrl+N, type "edit" at the command line, or hit the "New M-File" icon at the top left of the main screen (it looks like the little piece of paper with the explosion in the top left corner). To open a pre-existing M-File you need to switch the current directory to the location of the file (as mentioned above) and simply double click on the M-File name in the "current directory" sidebar.
- 6. Plot Window
- When the MATLAB plot tools are used the resulting graphics are displayed in separate plot windows (more on this later).
|
Mac and Linux users: please scroll further down.
Windows users
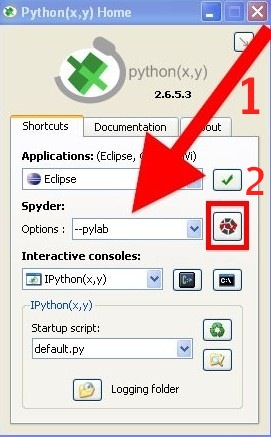
When starting Python(x,y) you will be presented with the following window.
Spyder (Scientific PYthon Development EnviRonment) is the name of the development environment we will be using.
- Select the --pylab option
- Then launch the Spyder environment.
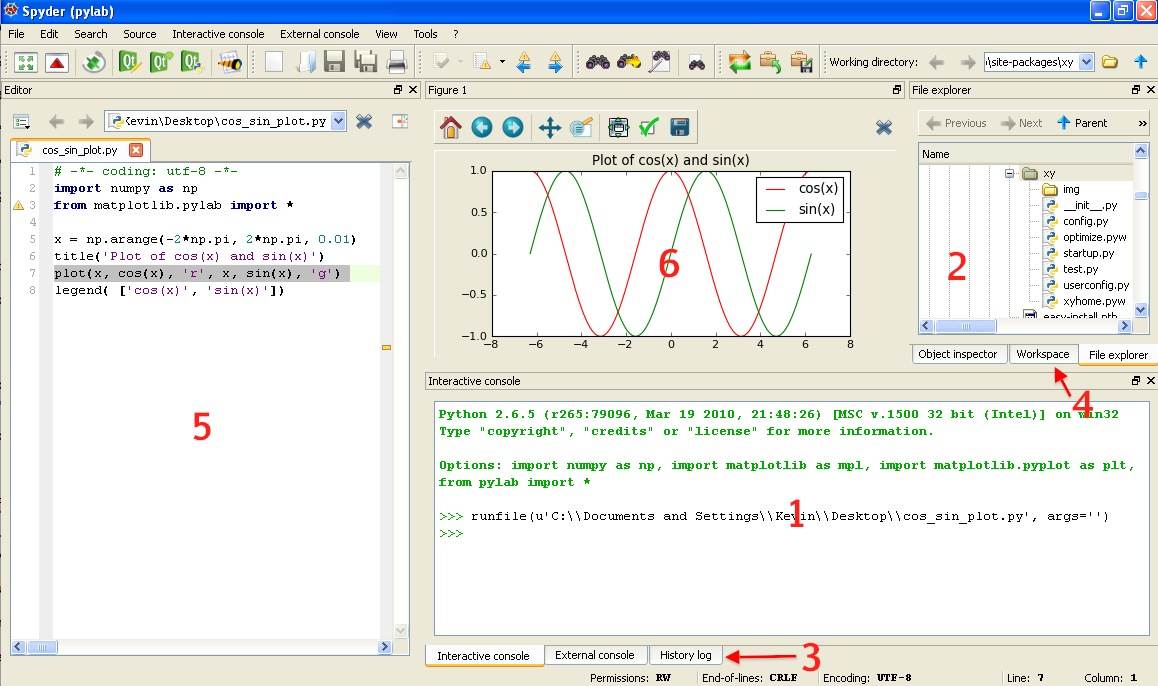
- Python(x,y) has a layout similar to that shown below
- 1. Command Window
- The command window is where you interact with Python. Commands entered here are processed immediately. While it is technically possible to write an entire program at the command line, this is not recommended. For true programs, you should write a script in region 5 of the software.
- 2. Current Directory
- The "current directory" panel lists all of the files that are located in the directory Python is currently accessing. This directory may be changed by navigating to a new directory and clicking on its name.
- 3. Command History
- The command history records all commands entered in the command window (for possible future reference).
- 4. Workspace
- The workspace lists all variables (e.g. vectors and matrices) currently available to you. The workspace also provides the size and "type" of variable. You can double click on a variable and change its value: e.g. edit a specific entry in a vector, in a spreadsheet-like interface.
- 5. Editor Window
- The editor window is where you write scripts and function files. After saving the file to disk, you can run it by pressing F9 (or click on Source in the top menu and select Run in interactive console)
You can have one or multiple files open at any time.
- 6. Plot Window
- Python plots are opened in new separate windows, but can be "docked" (placed) anywhere inside the main Python(x,y) window.
Mac users
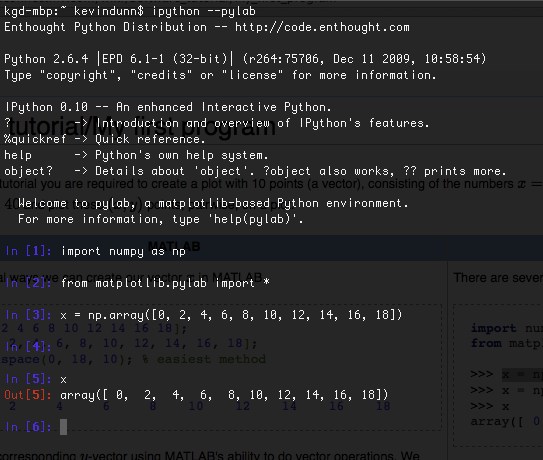
- Start the Terminal program, which will bring up a command window.
- Then type the following command to start:
and you should get this window,
Now you can proceed with the rest of the tutorial and should get exactly the same outputs.
Linux users
This tutorial step assumes that you have already installed Enthought's Python distribution.
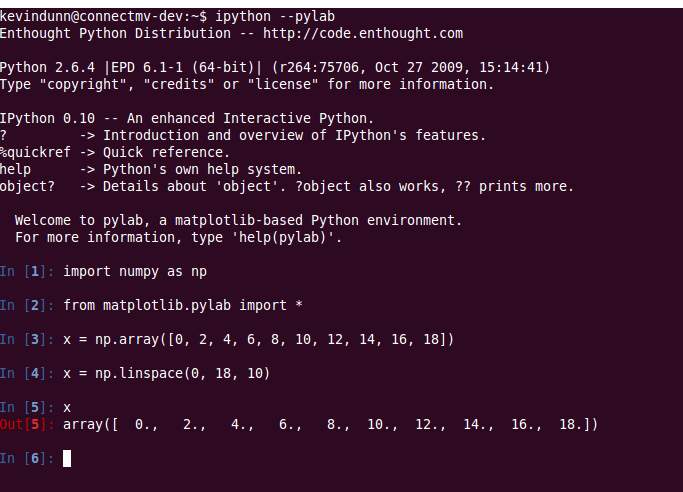
I expect you know how to start your shell, e.g. the bash shell. Once you are in the shell, just type:
and you should get this window (screenshot from Ubuntu Linux)
where you can type in Python commands.
Now you can proceed with the rest of the tutorial and should get exactly the same outputs.
|
